Search Website
70 results found with an empty search
- Industrial Epoxy Flooring: The No-BS Warehouse Installation Guide
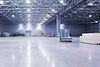
Industrial Epoxy Flooring for Warehouses: Why You Need the Right Contractor Industrial epoxy flooring for warehouses requires specialized contractors who understand heavy equipment loads, 24/7 operations, and safety regulations. Professional installation costs vary significantly based on square footage, concrete condition, and coating system selected, typically ranging from $3-8 per square foot. Proper contractor selection determines whether your floor lasts 20 years or fails within two. The Uncomfortable Truth About Your Warehouse Floor Let's cut through the BS. Your warehouse floor is taking a beating every single day. That patched-up concrete disaster you're walking on? It's costing you more money than you think. Here's what kills me: warehouse owners will spend $500K on a new forklift fleet but balk at $50K to fix the surface those forklifts destroy. I've been in the industrial flooring game for over a decade. I've seen every half-assed "solution" fail spectacularly. You know what's worse than an expensive floor? Replacing a cheap one twice. We're about to talk real numbers, real solutions, and why most contractors are selling you expensive Band-Aids instead of actual flooring systems. Why Most Warehouse Floors Fail (And Your Contractor Won't Tell You) Here's the dirty little secret about industrial flooring: 80% of failures happen because your contractor treated your warehouse like an oversized garage. They show up with the same materials they'd use for residential work, slap on a coating, and cash your check before the real problems start. The reality? Your warehouse isn't a garage. You've got: Forklifts dropping 5,000-pound loads all day. Chemical spills that would melt residential coatings. Temperature swings from freezing winters to blazing summers. Moisture coming up through that slab like it owns the place. 24/7 operations that never give the floor a break. Most contractors don't want to talk about vapor transmission rates, compressive strength, or thermal shock resistance. They want to quote you the cheapest option and move on. Here's what actually matters: Real Industrial Requirements: Compressive strength over 10,000 PSI. Chemical resistance matched to your inventory. Abrasion resistance for constant traffic. Thermal stability for temperature extremes. Moisture tolerance for slab conditions. Impact resistance for dropped loads. Epoxy strip in industrial warehouse. The Four Types of Warehouses (And Why Each One Needs Different Flooring) After fixing floors in every type of facility imaginable, I've learned that cookie-cutter solutions are ineffective. Your flooring needs depend entirely on what you're actually doing in that space. Distribution Centers & Logistics Hubs Constant forklift traffic demands maximum abrasion resistance. Wide temperature swings from dock doors opening. Need clear traffic lanes that won't wear off. Quick-return-to-service is critical. Food & Beverage Warehouses USDA/FDA compliance requirements. Thermal shock from freezer traffic. Antimicrobial properties. Easy-clean surfaces for spills. Slip resistance when wet. Manufacturing & Assembly Chemical resistance specific to your processes. Static control for electronics. Vibration resistance from machinery. Custom safety zones and markings. E-commerce Fulfillment Ultra-flat surfaces for robotics. 24/7 operations mean minimal downtime. High-visibility markings for efficiency. Dust-free surfaces for product protection. The Real Cost of Industrial Epoxy (Nobody Wants to Quote You Straight) Here's what frustrates me about this industry: everyone dances around pricing like it's some mystical secret. Let me break it down straight: Industrial Epoxy Coating Systems (costs vary based on project specifics): Basic 2-coat system: $3-5/sq ft. High-build industrial system: $5-8/sq ft. Specialized chemical-resistant: $7-12/sq ft. Decorative safety systems: $8-15/sq ft. These ranges vary significantly based on: Current concrete condition (is it shot to hell or decent?). Required prep work (grinding, shot blasting, repairs). Downtime constraints (weekend/night work costs more). System complexity (basic vs. multi-layer build). Geographic location (labor and material costs vary). Access issues (can we get equipment in easily?). For a typical 20,000 sq ft warehouse, you're looking at $60K-$160K depending on what you actually need. Yeah, that's a wide range. Anyone who quotes you a price without seeing your floor is lying to you. Before and after, the difference a floor makes! Your Installation Options (And Why They Matter) Option 1: The "Cheap and Cheerful" Disaster Some contractor quotes you $2/sq ft for a thin-build system. Sounds great until it starts peeling in six months. This is basically painting your floor with slightly better paint. I've torn out more of these failed systems than I can count. Option 2: The Actual Industrial Solution A real industrial system with proper prep, primer, build coats, and topcoat. This is what you should be getting. It costs more because it actually works. We're talking: Shot blast or diamond grind the entire surface. Fill cracks and joints properly. Apply moisture mitigation if needed. Prime coat for adhesion. High-build epoxy or urethane base. Chemical-resistant topcoat. Option 3: The Specialized System Your facility might need specific features: ESD/conductive flooring for electronics ($10-15/sq ft). Cryogenic resistance for cold storage ($8-12/sq ft). Heavy-build for extreme loads ($12-20/sq ft). Decorative quartz/flake systems ($8-14/sq ft). C*Rock Making it Happen Why Timing Your Installation Matters More Than You Think Every warehouse manager wants their floor done "yesterday." Here's the reality: rushing this process is like building a house on quicksand. The contractors promising miracle timelines? They're the ones whose work I'm usually hired to fix. Realistic Timeline for 20,000 sq ft: Day 1-2: Prep work (the most critical phase). Day 3-4: Prime coat and repairs. Day 5-6: Build coat application. Day 7: Topcoat and detailing. Day 8-10: Cure time before traffic. Can it be done faster? Sure, if you want to do it again in two years. The cure time isn't negotiable - chemistry doesn't care about your deadline. Strategic Installation Windows: Holiday shutdowns (Thanksgiving, Christmas). Scheduled maintenance periods. Between seasonal peaks. During inventory transitions. Slow season for your industry. Red Flags: When to Run From a Contractor After a decade watching contractors butcher warehouse floors, I can spot a hack instantly. Watch for these warning signs: They're Full of Shit If: They quote without visiting your facility. They don't ask about your operations. They can't explain their prep process. They don't mention moisture testing. They promise unrealistic timelines. They only talk about price, not performance. They bad-mouth every other contractor (insecurity much?). They don't have specific industrial references. Questions They Should Be Asking: Traffic patterns and load weights? Chemical exposure types? Temperature extremes in your facility? Current floor problems and history? Downtime constraints and operational windows? Safety requirements and compliance needs? Future plans that might affect flooring? If your contractor isn't asking these questions, they're not planning for success - they're planning for a quick payday. The Climate Factor Nobody Talks About Your geographic location massively impacts your flooring choice, and most contractors pretend it doesn't matter. Here's the truth: Cold Climate Challenges: Freeze-thaw cycles destroy weak coatings. Salt and deicing chemicals eat through cheap systems. Cold-weather installation requires special materials. Thermal shock from heated interiors to cold docks. Hot Climate Issues: High temps can cause coating failures. UV exposure degrades certain systems. Thermal expansion stresses the coating. Faster cure times can cause installation problems. Coastal Considerations: Salt air accelerates coating breakdown. Higher moisture requires vapor barriers. Humidity affects installation and cure. Dry Climate Benefits: Easier moisture control. More predictable installation conditions. Longer working seasons. Making the Investment Decision Look, I get it. Dropping six figures on a floor feels like a lot when that concrete "works fine." But here's what actually matters: The Real ROI Nobody Calculates: Reduced equipment maintenance (smooth floors = longer forklift life). Lower cleaning costs (2-3 hours vs. 8-10 hours). Fewer worker injuries (level surfaces, clear markings). Increased property value (15-20% boost for quality floors). Operational efficiency (20% faster pick rates with proper lanes). Reduced product damage (no more concrete dust). That $100K floor investment? Over 20 years, it's $5K per year. Your monthly forklift lease probably costs more. Your workers' comp claims from trips and falls? Definitely cost more. Hidden Costs of Doing Nothing: Equipment damage from rough surfaces. Lost productivity from unclear traffic patterns. Worker injuries from deteriorating concrete. Customer complaints about dust/debris. Higher insurance premiums. Eventually, complete slab replacement. The Installation Process That Actually Works Forget what you've heard about "quick and easy" floor coatings. Here's how it's really done when you want it to last: Phase 1: Brutal Honesty Assessment Core samples to test concrete integrity. Moisture testing (this is non-negotiable). Traffic pattern analysis. Chemical exposure inventory. Operational requirement review. Phase 2: Prep Like Your Business Depends on It Remove all existing coatings. Shot blast or diamond grind to proper profile. Repair all cracks and joints. Address moisture issues (not just ignore them). Create proper slopes for drainage. Phase 3: System Application Prime coat for maximum adhesion. Build coats for thickness and durability. Broadcast aggregates for slip resistance. Topcoat for chemical resistance. Line striping and safety markings. Phase 4: Quality Control Thickness testing throughout. Adhesion testing. Holiday detection (finding pinholes). Final inspection before traffic. Next Steps That Actually Make Sense If you've made it this far, you're serious about fixing your floor situation. Here's what happens next: Get a Real Assessment - Not a drive-by quote. A comprehensive evaluation with moisture testing, traffic analysis, and honest feedback about your options. Understand Your True Needs - Based on your actual operations, not what the contractor wants to sell. This includes current problems and future plans. Plan for Reality - Including downtime, cure schedules, and long-term performance. No fairy tales about weekend miracles. Choose Based on Total Value - Installation cost + maintenance + lifespan + operational impact = real cost. Execute Properly - With the right contractor, materials, and timeline. No shortcuts. The Bottom Line Your warehouse floor is either an asset or a liability. There's no middle ground. Every day you operate on failing concrete, you're losing money to inefficiency, repairs, and risk. The question isn't whether you can afford to fix it. It's whether you can afford not to. And if you're still thinking that beat-up concrete is "good enough," you're lying to yourself harder than the contractor who's about to sell you a coating that'll peel off in six months. Want to know if your floor is salvageable or needs complete replacement? Want straight answers about costs and timelines? Stop listening to contractors who just want to make a quick buck and start talking to people who actually understand industrial flooring. C*Rock Finishing - Your Bay Area Concrete Experts C*Rock Finishing has been the Bay Area's trusted concrete finishing contractor since 2014, maintaining a 98.7% on-time and on-budget delivery rate. Specializing in epoxy flooring, concrete polishing, concrete staining, and concrete sealing, we serve residential and commercial clients throughout Oakland, San Francisco, San Jose, and beyond. Ready to transform your warehouse floor? Contact us at (510) 214-6862 for a project-specific quote or visit www.crockfinish.com/epoxy-flooring .
- Best Flooring for High-Traffic Retail: Bay Area Business Owner's Guide
Quick Answer: High-traffic Bay Area retail spaces require flooring that withstands heavy foot traffic, display fixture loads, continuous cleaning, and UV exposure from storefront windows while maintaining appearance for 10-15+ years. Polished concrete and commercial-grade epoxy systems are the only flooring types that deliver this performance in real retail conditions. Costs vary significantly based on space size, existing floor condition, desired aesthetics, and operational requirements. Traditional retail flooring options like tile, carpet, and vinyl fail within 3-7 years under actual retail traffic loads. Introduction Open a retail store in Oakland, San Francisco, or San Jose and you'll learn an expensive lesson: most flooring can't actually handle retail traffic. The beautiful tile floor you installed looks worn and dated within three years. The carpet shows traffic patterns within months. The vinyl starts separating at the seams before your first anniversary. Here's what commercial flooring salespeople don't tell you: "commercial grade" doesn't mean "survives retail conditions." It means "slightly better than residential." Most flooring marketed to retailers fails under real-world use because it was never designed for the punishment retail spaces actually experience. We've been installing flooring for Bay Area retail operations since 2014. We've seen every type of flooring fail, watched retailers cycle through expensive replacements every few years, and learned what actually works in high-traffic Bay Area retail environments. Want to stop replacing your floors? Let's talk about what actually survives. What High-Traffic Actually Means Before we discuss materials, let's be clear about what "high-traffic" means in retail terms - because it's probably more demanding than you think. Real Retail Traffic Loads: Foot Traffic Volume - A busy Bay Area retail store might see 500-1,000+ customers per day on weekends. That's 15,000-30,000 customer visits per month, plus staff traffic. Concentrated Wear Patterns - Unlike residential spaces where traffic spreads out, retail has predictable wear patterns: entrances, checkout areas, popular product zones. These areas take 10x the traffic of other spots. Equipment Loads - Display fixtures, merchandising units, POS systems, and inventory carts create point loads and constant movement that residential flooring never experiences. Maintenance Challenges - Retail floors get cleaned daily with commercial products, experience constant spills from customers, and must maintain appearance while being used continuously. Environmental Factors - Storefront windows mean constant UV exposure. HVAC systems cycling constantly. Seasonal weather changes bringing in moisture, salt, and debris. The reality check: Most flooring you'll see in catalogs is tested under residential conditions or light commercial traffic. Actual retail conditions destroy these floors within 3-5 years. Why Most Retail Flooring Fails Fast Let's talk about what happens to different flooring types in real Bay Area retail environments: Carpet in Retail: Shows traffic patterns within 3-6 months of installation. High-traffic areas become visibly worn and matted. Stains from customer spills are permanent. Harbors bacteria, allergens, and odors. Looks unprofessional and dated quickly. Replacement every 2-3 years costs $8-15K for typical Bay Area retail space (1,500-2,500 sqft). Over 10 years, you're spending $30-50K+ on carpet replacements. Tile Flooring: Grout lines show dirt and staining within months. Tiles crack under display fixtures and heavy equipment. Looks worn and dated within 5 years despite being "durable." Grout requires constant cleaning and periodic replacement. Floor replacement costs $20-35K for average Bay Area retail space. Factor in 2-3 replacements over 15 years and you're looking at $50-100K+ in flooring costs. Luxury Vinyl/LVT: Scratches from fixtures, carts, and customer traffic visible within first year. Seams separate under UV exposure from storefronts. Discolors from sunlight in window areas. Individual planks fail and are impossible to match for repairs. Needs replacement every 5-7 years at $12-22K per replacement for typical Bay Area retail space. Painted or Sealed Concrete: Paint wears through in high-traffic areas within 12-18 months. Basic sealers break down under commercial cleaning products. Not truly sealed - moisture and stains still penetrate. Requires constant maintenance and recoating. Looks progressively worse each year. The uncomfortable truth: Most Bay Area retailers are stuck in an expensive flooring replacement cycle because they chose materials that were never designed for retail traffic levels. What Actually Survives Retail Traffic Only two flooring systems consistently survive 10-15+ years in high-traffic Bay Area retail environments: polished concrete and commercial-grade epoxy. Polished Concrete for Retail: Why It Works - Polished concrete is essentially a lifetime floor. It never becomes "unpolished" under traffic. The mechanical polishing process densifies the concrete surface, making it harder and more durable over time. With proper maintenance, it lasts indefinitely. When refinishing is needed after 15-20+ years of heavy retail traffic, the process costs a fraction of original installation and brings the floor back to day-one appearance. Maintenance Reality - Polished concrete is breathable and can absorb spills if not cleaned promptly. Control joints and expansion joints in the concrete may need periodic attention. But here's the key difference from other flooring: when wear patterns develop after years of use, refinishing addresses the entire surface and brings it back to new condition. Whether you refinish at 10 years or 20+ years, the result looks like installation day. Aesthetic Advantage - Modern, minimalist look that Bay Area customers expect. Reflective surface makes spaces feel larger and brighter. Can be customized with different finish levels for different aesthetic effects. Never looks dated because the style is timeless. Cost Reality - For a 2,000 sqft Bay Area retail space with average conditions, polished concrete might cost somewhere between $15-30K installed. This seems expensive until you compare it to tile replacement every 5-7 years at $15-40K per replacement. Over 20 years, polished concrete is still going strong while you'd have possibly replace tile 3+ times at $45-120K total. All polished concrete pricing varies based on existing slab condition, desired finish level, control joint condition, and project specifics. Commercial-Grade Epoxy for Retail: When Epoxy Works - Epoxy systems work exceptionally well in retail environments that need specific colors, branding elements, or custom designs. Seamless surface, highly durable, customizable aesthetics. Particularly good for retail spaces in older buildings where concrete slabs aren't suitable for polishing. Key Differences - Not all epoxy is created equal. Residential-grade or thin-build epoxy fails under retail traffic. Commercial-grade thick-build systems with proper slip resistance and UV stability are required for retail applications. Design Flexibility - Can match brand colors, incorporate logos, create specific aesthetic effects. More design options than polished concrete while maintaining durability. Making the Right Choice for Your Space Different retail spaces have different requirements. Here's how to think about your specific situation: Best for Polished Concrete: Modern, minimalist brand aesthetic Ground-floor retail with suitable concrete slab High-traffic areas needing maximum durability Businesses prioritizing long-term cost efficiency Retail spaces with significant natural light (won't discolor) Best for Commercial Epoxy: Retail requiring specific brand colors or custom designs Spaces in older buildings with unsuitable concrete for polishing Areas needing specific performance characteristics (anti-static, chemical resistance) Retail operations needing faster installation and return to service Not Suitable for Either: Spaces with severe foundation or moisture issues (must be remediated first). Very Rare... Areas where landlords prohibit permanent floor modifications Extremely short-term lease situations (under 3 years), depending on usecase... Installation Planning for Operating Retail Here's what Bay Area retail owners need to know about installing proper flooring while operating: Timeline Considerations: New Construction - Ideal scenario. Install before fixtures, before opening, before you start paying rent on an operating store. Tenant Improvements - Second-best scenario. Install during lease improvements before you open. Coordinate with other construction work. Operating Retail - Most challenging. You need to close or coordinate section-by-section installation. Every day closed is lost revenue. Plan during slow season or schedule around planned closures. Realistic Timelines - Polished concrete for 2,000 sqft retail space typically takes 3-6days to complete. Commercial epoxy for similar space typically takes 2-5 days. Anyone promising same-day or next-day installation is installing systems that won't survive retail traffic. Variation in size effects timelines of course... Cost Variables: Space Configuration - Open retail floor vs. spaces with multiple rooms affects installation complexity and cost. Fixture Moving - Heavy displays, checkout counters, and built-in fixtures need to be moved. Some contractors coordinate this; others expect you to handle it. Existing Floor Removal - If removing tile, vinyl, or other flooring, this adds time and cost. Varies significantly based on what's being removed and condition of substrate underneath. Realistic Pricing - Retail flooring costs vary significantly based on space size, existing floor condition, desired finish or system, fixture complexity, storefront window considerations, and scheduling constraints. A 1,500 sqft Oakland boutique has different requirements than a 5,000 sqft San Francisco showroom. Anyone giving fixed pricing without evaluating your specific space is guessing. Bay Area Retail Market Considerations Operating retail in the Bay Area comes with unique considerations for flooring: Customer Expectations - Bay Area shoppers expect modern, well-maintained retail environments. Your floor communicates your brand quality before customers interact with products or staff. Competitive Pressure - In competitive Bay Area retail markets, you can't afford extended closures for flooring work. Getting it right the first time matters. Building Age Challenges - Many prime Bay Area retail locations are in older buildings. Foundation settling, moisture issues, and uneven floors are common. These must be addressed before proper flooring installation. Investment Horizon - If you're planning to be in your location for 10+ years, lifetime flooring makes sense. If you're uncertain about long-term location, factor that into your decision. Common Mistakes Retail Owners Make After watching hundreds of retail floor installations over the past decade, here are the mistakes we see repeatedly: Choosing Based on Initial Cost - Picking the cheapest option means replacing your floor multiple times. The "expensive" choice becomes the economical choice over 10-15 years. Ignoring Traffic Reality - Installing flooring rated for "commercial" use doesn't mean it can handle actual retail traffic. Most commercial flooring is designed for office environments, not retail. Not Planning for Maintenance - Every flooring type requires maintenance. The question is whether maintenance brings the floor back to new condition (polished concrete, epoxy) or just delays inevitable replacement (tile, vinyl, carpet). Hiring General Contractors - Your general contractor probably doesn't understand high-traffic retail flooring requirements. They'll install what they know or what's easiest for them, not what your space actually needs. Skipping Site Evaluation - Installing flooring without proper substrate evaluation leads to premature failure. Concrete moisture, cracks, and condition must be assessed before installation. C*Rock's Bay Area Retail Expertise We've been installing flooring for Bay Area retail spaces since 2014, maintaining a 98.7% on-time completion rate. Our retail expertise includes: Commercial-grade polished concrete for high-traffic retail showrooms and boutiques Commercial epoxy systems for retail spaces requiring custom aesthetics Traffic-focused installations designed for Bay Area retail conditions Minimal disruption scheduling coordinated around retail operations Honest assessments of what your space actually needs Retail flooring isn't just about appearance - it's about durability, maintenance costs, customer perception, and long-term business economics. The Bottom Line Most Bay Area retailers are wasting money on flooring that wasn't designed to survive retail traffic. They're stuck in an expensive replacement cycle, closing their stores for installations every few years, and dealing with floors that look worn and dated long before replacement. The solution isn't complicated: install flooring designed for actual retail conditions. Spend more initially for a floor that lasts 15-20+ years, or keep spending on replacements every 3-7 years. Your competitors are figuring this out. Your customers are noticing your floor condition. The question is whether you'll make the change proactively or wait until your current floor becomes a liability. C*Rock Finishing - Your Bay Area Concrete Experts C*Rock Finishing has been the Bay Area's trusted concrete finishing contractor since 2014, maintaining a 98.7% on-time and on-budget delivery rate. Specializing in commercial-grade polished concrete, epoxy flooring, concrete staining, and concrete sealing for retail spaces, we serve commercial clients throughout Oakland, San Francisco, San Jose, and the entire Bay Area. Ready to install flooring that actually survives retail traffic? Contact us at (510) 214-6862 for a project-specific evaluation or visit www.crockfinish.com/polished-concrete-flooring to learn more about retail flooring solutions.
- Bay Area Commercial Concrete Prep: Best Times & Why
Smart Timing for Commercial Concrete Prep in the Bay Area: Why It Matters Smart timing for commercial concrete prep in the Bay Area can mean the difference between a coating that lasts 10 years and one that fails in 10 months. The sweet spot runs from September through November, when ideal temperatures, low moisture, and contractor availability align. Missing this window typically results in 20-30% higher costs, extended cure times, and increased risk of coating failure due to winter moisture issues. Moisture on a untreated concrete warehouse. The Uncomfortable Truth About Timing Your Concrete Work Here’s what kills me about this industry. Every October, my phone blows up with panicked facility managers who just realized their unsealed concrete is about to get destroyed by winter. They had all summer to handle it, but now they’re scrambling because someone pointed out those hairline cracks are about to become the Grand Canyon. Let’s cut through the BS: Bay Area winters might not bring snow, but they bring something worse for concrete—moisture. And moisture is to unsealed concrete what kryptonite is to Superman, except your floor can’t fly away from the problem. The real kicker? These same people who wait until November to panic are the ones complaining about price increases when every contractor is booked solid and materials take three weeks to arrive. It’s like waiting until December 23rd to buy Christmas presents and acting shocked that everything costs more. Why Timing Actually Matters (The Science Nobody Explains) Look, nobody wakes up thinking about concrete moisture vapor transmission rates. But here’s the bottom line: concrete is basically a giant sponge, and Bay Area winters turn that sponge into a waterlogged mess. The Temperature Sweet Spot Fall gives us that Goldilocks zone for concrete work: Daytime temps between 60-75°F (perfect for curing) Overnight temps above 50°F (no cure interruption) Low humidity compared to winter Minimal rain disruption When you try to install coatings in January, you’re fighting: Extended cure times (2-3 days becomes 4-6 days) Moisture trapped under coatings (hello, delamination) Temperature fluctuations causing coating failures Rain delays pushing projects weeks out Cracked concrete flooring The Moisture Problem That Costs Thousands Here’s the dirty secret: that concrete slab is constantly breathing. In summer, moisture moves up and evaporates. No big deal. But seal that floor in winter without proper timing? You’ve created a moisture sandwich that’ll bubble your brand new coating faster than you can say “warranty claim.” The Real Cost of Bad Timing Everyone thinks the biggest cost of poor timing is financial. Wrong. The biggest cost is shutting down operations twice—once for the install that fails, and again to fix it properly. What Proper Timing Prevents: Moisture-related failures (#1 reason for delamination) Salt damage from winter deicers Crack expansion from freeze-thaw cycles Stain penetration during busy season Slip hazards from deteriorating concrete The Financial Reality Smart timing saves money. Period. Contractor availability = competitive pricing Better weather = faster installation = less downtime Proper curing = longer-lasting results Prevention beats emergency repairs every time Note: All costs vary based on square footage, conditions, and specific project requirements. Your Concrete Prep Timeline (What Actually Works) September: Assessment Phase Document every crack, stain, and problem area. Test moisture levels (especially with past water issues). Get multiple quotes while contractors aren’t slammed. Plan your shutdown schedule. October: Lock It Down Secure your contractor before the panic hits. Order materials while supply chains work normally. Prep your space and plan workflows. Communicate with everyone affected. In the Surface Prep Process November: Last Call Execute work while weather cooperates. Allow proper cure time (no holiday rush). Complete inspection before December chaos. Document everything for warranties. December-February: The Danger Zone If you must work in winter: Expect 20-30% higher costs. Use cold-weather formulations. Plan for weather delays. Consider temporary solutions until spring. Industry-Specific Timing Considerations Warehouses & Distribution Schedule between inventory cycles. Address loading docks. Plan forklift rerouting. Consider a section-by-section approach. Food Service & Manufacturing Coordinate with inspections and shutdowns. Ensure compliance materials. Factor in extended cure times. Retail Spaces Complete before Black Friday. Use low-odor products. Ensure slip resistance. Plan after-hours work. Common Timing Myths That Cost Money “Bay Area weather is mild; timing doesn’t matter.” Tell that to coatings installed during January rain. “We’ll just heat the space to cure faster.” Congratulations, you’ve created a potato chip coating. “It’s cheaper in the slow season.” Your slow season is every contractor’s busy season. The Bottom Line on Concrete Prep Timing Every day past September, your options get more expensive and limited. It’s not about scaring you—it’s physics, chemistry, and contractor schedules. The managers who get this right aren’t smarter—they learned the expensive way that timing matters. Their floors look good in February while everyone else deals with bubbling coatings and emergency repairs. The real secret? Plan your fall floor work in July. Second best time? Right now, before every other facility manager books the good contractors. C*Rock Finishing - Your Bay Area Concrete Experts C*Rock Finishing has been the Bay Area’s trusted concrete finishing contractor since 2014, maintaining a 98.7% on-time and on-budget delivery rate. Specializing in epoxy flooring, concrete polishing, concrete staining, and concrete sealing, we serve commercial and industrial clients throughout Oakland, San Francisco, San Jose, and beyond. Ready to time your project right? Contact us at (510) 214-6862 for a project-specific assessment, or visit www.crockfinish.com/commercial-concrete-services to learn more about smart scheduling for concrete prep.
- The Benefits of Epoxy Flooring for Industrial Spaces
Why Choose Epoxy Flooring for Your Industrial Space? Epoxy flooring offers a unique combination of durability, aesthetic appeal, and cost-effectiveness, making it an excellent choice for industrial environments. 1. Superior Durability Epoxy's chemical composition provides impressive resilience against impacts, heavy machinery, and high foot traffic. Whether your facility is located in Oakland, San Francisco, or other Bay Area regions, its durability ensures that your flooring will stand the test of time, saving you medical bills and repairs. Additionally, epoxy is resistant to various chemicals, making it ideal for warehouses and manufacturing plants where spills are common. 2. Easy Customization One of the standout features of epoxy flooring is its wide range of customization options. You can choose from an array of colors, patterns, and finishes to tailor the flooring to your company's branding while maintaining a professional look. This visual appeal can significantly contribute to a positive working environment, motivating employees and impressing clients. 3. Cost-Effective Investment In the long run, epoxy flooring can be a cost-effective investment for your industrial application. While the initial installation cost may be higher than other flooring options, the longevity and low maintenance requirements significantly reduce long-term expenses. ROI becomes clearer as you enjoy fewer repairs, longer lifespan, and decreased downtime due to flooring issues. Technical Aspects of Installation and Durability The installation of epoxy flooring requires a skilled workforce to ensure that the final product meets the highest standards. Installation Process The installation process typically involves several steps: Preparation : The existing concrete surface must be thoroughly cleaned and repaired to ensure proper adhesion. This may include grinding or shot blasting the surface to remove any contaminants and achieve a rough texture. Priming : A primer is applied to enhance the bond between the concrete and the epoxy coating. Application : The epoxy is mixed and poured, then spread evenly across the floor. This can include additional coatings for added durability. Curing : The floor must cure for a designated period, allowing the epoxy to harden fully. Each step is crucial to achieving a durable and aesthetically pleasing finish. Durability Realities Once installed, epoxy flooring can last anywhere from 10 to 20 years with proper maintenance. Its resistance to abrasions, chemicals, and thermal shocks makes it perfect for industries such as manufacturing, warehouses, and automotive facilities. Maintenance Requirements for Longevity Despite its durability, epoxy flooring requires regular maintenance to keep it looking its best and functioning efficiently. Routine Care Daily Cleaning : Sweeping and mopping with a compatible cleaner can help prevent dirt and grime buildup. Periodic Inspections : Regular checks for damage or wear can ensure that minor issues are addressed before they escalate. Avoiding Harsh Chemicals : Using pH-neutral cleaners is essential to preserve the epoxy finish. Keeping these maintenance tips in mind will extend the life of your flooring while retaining its aesthetic appeal. C*Rock Finishing as Bay Area's Top Provider With our extensive experience and dedication to quality, C*Rock Finishing has established itself as the top provider of epoxy flooring solutions in the Bay Area. We understand the unique challenges faced by industrial facilities in Oakland, San Francisco, and beyond. Our team's commitment to customer satisfaction and our impressive on-time completion rate showcase our reliability and professionalism. Addressing Common Concerns As a business decision-maker, you may have concerns about the durability, timeline, ROI, and safety of epoxy flooring. Durability : With proper installation and maintenance, you can expect a long-lasting performance from your epoxy floor. Timeline : While significant installations may take multiple days, our efficient processes minimize disruption to your operations, ensuring timely project completion. ROI : The longevity and low maintenance needs of epoxy flooring translate into considerable savings over time. Safety : Epoxy can be treated with anti-slip additives, presenting a safe surface for employee movement even in high-traffic areas. The Versatility of Epoxy Flooring Epoxy flooring is not just for industrial spaces. It can also be used in various settings, including: Commercial Spaces In commercial environments, epoxy flooring can enhance the aesthetic appeal while providing a durable surface. Retail stores, showrooms, and restaurants benefit from its easy maintenance and customizable options. Residential Applications Homeowners are increasingly choosing epoxy flooring for garages, basements, and even kitchens. Its resistance to stains and spills makes it a practical choice for busy households. Healthcare Facilities In healthcare settings, hygiene is paramount. Epoxy flooring is seamless and easy to clean, making it ideal for hospitals and clinics where cleanliness is crucial. Conclusion Choosing epoxy flooring for your industrial application is an investment that combines durability, aesthetic appeal, and cost efficiency. With the Bay Area's trusted provider, C*Rock Finishing, you're guaranteed expert advice and exceptional service. Ensure your facility stands out while providing a safe and efficient environment for your employees. Call us today at 510-214-6862 for a quote and discover how we can transform your industrial space with high-quality epoxy flooring! A well-finished epoxy floor in an industrial setting.
- The Ultimate Guide to Polishing Concrete: Step-by-Step Instructions for a Durable and Glossy Finish.
Polishing concrete is a process that involves using specialized equipment and diamond impregnated metal, resin, or other ceramic materials to mechanically densify the the surface of a concrete floor to essentially seal it onto itself. This process is typically used to create a gloss finish on concrete surfaces, which improve the appearance and durability of the floor. A maintained concrete floor is essentially a lifetime floor and will always be ready for use, both light and heavy traffic. Polishing concrete can be performed on both new and existing concrete surfaces, and it is often used in commercial, industrial, and residential settings. To polish concrete properly, it is important to follow a specific set of steps and use the appropriate equipment and materials. Here is a step-by-step guide on how to polish concrete: Prep the concrete surface. Before beginning the polishing process, it is important to properly prepare the concrete surface. This typically involves grinding the surface with metal bonded diamonds to "open up" the concretes surface and remove any imperfections or surface contaminants. A concrete grinder/polisher hooked up to a HEPA vacuum are essential for this process. 2. Using progressively finer diamonds over the course of roughly 7-15 passes to mechnically densify the substrate. Once the surface has been prepared, the polisher will begin the actual polishing process using diamond impregrnated resin pads, most likely. All concrete slabs are somewhat unique and require different tooling at times. The grinder/polisher will work in a quadrent like fashion, using overlapping passes to ensure an even finish. As the polisher moves over the surface of the concrete the concrete is becoming more and more dense as the surface tightens smaller and smaller, also increasing the light reflection aspect of the surface which is why it will start to gloss as well. 3. Use of a densifier. In some cases, it may be necessary to use a densifier during the polishing process. A densifier is a chemical compound that is applied to the surface of the concrete to improve its density and hardness, usually water based, this solution is made up of mostly lithium silicates which lock together with the lyme in the concretes composition, creating an even more molecularly strong structure. Densifiers can help to improve the durability and resistance of the concrete surface, making it less prone to staining and wear, and improve overall gloss after polishing. 4. Finish with a sealer. Once the desired level of polish has been achieved, it is important to apply a sealer to the surface of the concrete. A sealer will help to protect the polished concrete surface from wear and tear, as well as increase it's overall lifetime between maintenance cleaning and sealing, and it will also help to preserve the shine of the floor. There are several types of sealers available, including water-based and solvent-based options. It is important to choose a sealer that is appropriate for the specific needs of the concrete surface. Such as if you need a oil or chemical resistance for the floor as well. 5. Maintaining a polished concrete floor. Proper maintenance is crucial to preserving the shine of a polished concrete surface. This typically involves regularly wiping the floor with very mild, specific to concrete, detergents and water, and avoiding the use of harsh chemicals or abrasive cleaners. It is also important to avoid using sharp objects or heavy machinery on the polished surface, as this can cause damage to the floor. By following these steps, you can properly polish concrete and create a sleek, polished finish that will improve the appearance and durability of the floor. It is important to note that polishing concrete can be a labor-intensive process, and it may require the use of specialized equipment and materials. Which is why C*Rock Finishing is here to help!!! Please reach out to us on our contact page and we will be happy to discuss your project today and get you to the great concrete polished floor you deserve! trendlogbiz.com/expert-tips-maintaining-and-cleaning-crock-finish-surfaces-for-long-lasting-beauty
- Why Bay Area Property Owners Trust C*Rock Finishing for Expert Concrete Polishing
Elevate Your Floors with C*Rock Finishing If you’re searching for a flooring solution that’s durable, stylish, and easy to maintain , polished concrete is the way to go. And when it comes to expert concrete polishing in the Bay Area , no one does it better than C*Rock Finishing . Concrete Polishing As a trusted concrete finishing company , C*Rock Finishing transforms dull, lifeless concrete into highly polished, resilient surfaces for both homes and businesses . Whether you’re upgrading your garage, showroom, or commercial space , our team ensures long-lasting, visually stunning results . What Is Concrete Polishing? Concrete polishing is a multi-step process that grinds, refines, and seals raw concrete , creating a gloss or satin finish and durable surface . Unlike traditional flooring that wears down over time , C*Rock Finishing’s polished concrete offers: ✅ A sleek, modern look ✅ High durability against wear and tear ✅ Low maintenance—no need for waxing or coatings ✅ Improved indoor air quality with dust-resistant properties At C*Rock Finishing , we use state-of-the-art machinery and high-quality sealers to maximize durability and aesthetics , ensuring your floors stay in top condition for years to come . Why Bay Area Property Owners Choose C*Rock Finishing At C*Rock Finishing , we specialize in creating floors that not only look stunning but also stand the test of time . Here’s why homeowners and business owners across San Francisco, San Jose, Oakland, and beyond trust us for their concrete polishing needs : ✔ Superior Durability & Strength Our expert polishing techniques ensure your floors are: • Resistant to heavy foot traffic and machinery 💪 • Scratch and stain-resistant 🛡️ • Long-lasting, reducing the need for costly replacements ✔ Aesthetic Appeal & Custom Finishes We provide customizable finishes , including: • Matte, satin, or high-gloss finishes ✨ • Custom stains and color enhancements 🎨 • Unique aggregate exposure levels for a one-of-a-kind look ✔ Eco-Friendly & Cost-Effective Unlike carpet or tile , polished concrete is: • VOC-free , improving indoor air quality 🌍 • Energy-efficient , as it reflects light and reduces the need for artificial lighting 🔆 • A long-term investment , requiring minimal upkeep 💰 ✔ Low Maintenance & Easy Cleaning No need for waxing, sealing, or harsh chemicals ! Our polished floors: • Resist dirt, dust, and allergens 🌿 • Are easy to clean with just water and a mop 🧼 • Remain looking new for years with minimal effort Where to Use C*Rock Finishing’s Concrete Polishing Services Polished concrete is a versatile flooring solution that enhances: 🏠 Residential Homes – Perfect for garages, basements, kitchens, and living rooms . 🏢 Commercial Spaces – Great for offices, retail stores, and showrooms . 🏭 Industrial Facilities – Ideal for warehouses, manufacturing plants, and factories . 🍽️ Restaurants & Hospitality – Sleek and durable for hotels, restaurants, and cafés . 🚗 Auto Shops & Dealerships – Resistant to oil spills, tire marks, and heavy traffic . Whether you’re a homeowner or a business owner , C*Rock Finishing has the expertise to deliver top-tier results . How Much Does Concrete Polishing Cost in the Bay Area? The cost of concrete polishing varies based on several factors, including: • Total square footage 📏 • Desired level of polish (matte, satin, high-gloss) ✨ • Condition of existing concrete (cracks, stains, imperfections) 🏗️ • Customization options (color staining, aggregate exposure, logo inlays) 🎨 At C*Rock Finishing , we offer competitive pricing and a FREE consultation to provide an accurate estimate based on your project’s needs. 📞 Contact us today to get your personalized quote! Why Choose C*Rock Finishing? Choosing the right concrete polishing contractor is crucial. Here’s why C*Rock Finishing is the #1 choice in the Bay Area : 🏆 Highly Experienced – Years of expertise in concrete finishing and polishing . 📍 Locally Owned & Operated – Proudly serving San Francisco, Oakland, San Jose, and beyond . 🛠️ Advanced Equipment & Techniques – Ensuring precision and long-lasting results . 💯 Customer Satisfaction Guarantee – Your happiness is our priority! 💰 Free Quotes & Competitive Pricing – No hidden fees, just top-quality service . Ready to Transform Your Floors? Contact C*Rock Finishing Today! If you’re looking for expert concrete polishing services in the Bay Area , trust C*Rock Finishing to deliver stunning, durable, and high-performance flooring . 📍 Serving: San Francisco | San Jose | Oakland | Berkeley | Santa Clara | Walnut Creek & More! 👉 Call us today or Request a FREE Quote Online Today! SEO-Optimized Meta Description
- 5 Innovative Ways Bay Area Businesses Are Embracing Epoxy Flooring: A First-Person Look at the Evolution of Trends
The flooring landscape in the Bay Area has evolved significantly, with businesses increasingly looking for solutions that are both functional and aesthetically pleasing. Epoxy flooring has emerged as a transformative option for commercial spaces, enhancing durability while providing a unique visual appeal. How C*Rock Finishing Can Help: C*Rock Finishing is here to assist you with all your epoxy flooring needs. Our expertise ensures that your business can take full advantage of the innovative benefits of epoxy flooring, creating an environment that is not only durable but also visually striking. Let us help you elevate your space with our specialized services. Click above to get a quote today! 1. Custom Designs for Unique Brand Identity Epoxy flooring opens the door to a world of creativity, allowing businesses to create flooring that truly reflects their brand. The rise in demand for customized designs shows just how important it is for businesses to stand out. For instance, a tech startup I visited chose a vibrant blue and green swirl pattern for their epoxy floors. This choice set them apart from traditional flooring, fostering a lively environment that sparks creativity. In fact, businesses that invest in custom flooring report a 30% increase in employee satisfaction, as their spaces feel more personal and engaging. Custom epoxy flooring design for a vibrant commercial space 2. Eco-Friendly Solutions at the Forefront Sustainability is on everyone's mind, especially in the Bay Area, where many businesses are committed to reducing their environmental footprint. Epoxy flooring manufacturers are stepping up with more eco-friendly options that maintain high durability and safety standards. Many businesses, especially restaurants and cafes, are choosing low-VOC (volatile organic compound) products. These options not only contribute to healthier indoor air quality but also resonate with eco-conscious customers. According to recent studies, businesses that implement eco-friendly practices can see an increase of up to 25% in customer loyalty. 3. Incorporation of Decorative Elements Decorative elements in epoxy flooring are gaining popularity, adding visual appeal to commercial spaces. From decorative chips to metallic finishes, local businesses are not shying away from bold choices. I visited a newly launched brewery that featured metallic epoxy flooring, which enhanced their warm lighting and created a cozy ambiance. This choice not only beautified their space but also attracted more customers who appreciate unique aesthetics. Businesses that incorporate such designs often see a 20% uptick in foot traffic due to their visually striking environments. Metallic epoxy flooring reflecting ambient light in a brewery 4. High Durability Meets Easy Maintenance For businesses in the bustling Bay Area, durability and low maintenance are crucial. Epoxy flooring stands out for its strength, making it ideal for high-traffic environments. I spoke with several restaurant owners who switched to epoxy flooring and noticed it could handle heavy foot traffic without showing signs of wear. With an expected lifespan of over 15 years, epoxy flooring remains a top choice for businesses that want a polished look year-round. Plus, its smooth surface makes cleaning simple, which is vital for maintaining hygiene in food establishments. 5. Enhanced Safety Features Safety is a major concern for businesses, especially those that involve a lot of movement. The integration of safety features into epoxy flooring is becoming increasingly important. I’ve seen businesses opt for non-slip finishes in high-risk areas, significantly reducing accidents. A local gym reported a 40% decrease in slip-and-fall incidents after switching to textured epoxy flooring. This focus on safety reassures both employees and customers, while still adding a stylish touch to the space. Reflecting on the Future of Flooring As I consider the impact of epoxy flooring in Bay Area businesses, it’s clear these changes extend beyond aesthetics. Business owners are starting to appreciate the numerous benefits of epoxy flooring, including customization, sustainability, durability, and safety. Whether choosing unique designs or prioritizing safety features, the evolution of epoxy flooring trends tells a compelling story of innovation in our local business community. For those looking to enhance their commercial spaces, embracing these trends may provide the key to improving both functionality and the overall experience for employees and customers alike.
- Why C*Rock Finishing is the Best Concrete Polishing and Epoxy Flooring Company in the Bay Area!
Short Answer : C*Rock Finishing distinguishes itself as the Bay Area's preeminent choice for concrete polishing and epoxy flooring. With a foundation built on unmatched expertise, state-of-the-art technology, and dedicated customer service, we deliver unparalleled finishes, confirming our status as the apex of concrete polishers and epoxy flooring installers from San Francisco to San Jose. Discover why C*Rock Finishing is the go-to expert for your next project. Elevating Spaces with Mastery and Precision Step into a world where every surface echoes the blend of aesthetic beauty and robust functionality. At C*Rock Finishing, this is our daily reality. We don't just craft floors; we create durable, beautiful foundations designed to support life's best moments. Serving areas from the heart of San Francisco to the vibrant communities of Oakland, we solidify our reputation with every project, proving time and again why we lead in the realms of concrete polishing and epoxy flooring. Here's the cornerstone of our unmatched supremacy: Founder's Vision : Our inception is a testament to a passion for revolutionizing spaces, turning the ordinary into extraordinary. Learn more about our roots and evolution at C*Rock Finishing - About Us . Custom Craftsmanship : Your space is unique, and so should be your floor. We believe in delivering personalized solutions, ensuring every square inch reflects your taste and class. Advanced Techniques : Embracing the latest innovations, we promise finishes that don't just dazzle on day one but maintain their lustre and resilience over time. Why Does C*Rock Finishing Stand Above the Rest? Depth of Experience : Our seasoned team brings invaluable hands-on experience to your project, adeptly handling challenges and delivering bespoke finishes. Personalized Designs : Forget one-size-fits-all; we design and implement flooring solutions tailor-made to your specifications and aesthetic preferences. Efficiency and Precision : Commitment to timelines without compromising quality is our mantra. We work diligently to ensure your project proceeds without a hitch and concludes on schedule. Environmental Consciousness : For us, sustainability is second nature. We offer eco-friendly flooring options that beautify your space and safeguard our planet. Unwavering Customer Focus : At C*Rock Finishing, your satisfaction is our driving force. Expect nothing less than impeccable service, transparent communication, and stunning results. Transform Your Space with the Finest Whether it's "the best epoxy flooring installers in San Francisco" or "the premier concrete polishers in San Jose" you're searching for, C*Rock Finishing's name is synonymous with excellence throughout the Bay Area. Our portfolio not only showcases our expertise but also reflects our commitment to fostering enduring client relationships. Eager to turn your vision into reality with the Bay Area's top concrete polishing and epoxy flooring specialists? Visit us at C*Rock Finishing to embark on a journey from vision to exquisite reality. With C*Rock Finishing, your project is an opportunity to showcase our commitment to excellence and your satisfaction. Remember : When seeking the best in concrete polishing and epoxy flooring across the Bay Area—from Mountain View to Benicia, or Marin to San Jose, or Dublin to San Mateo—C*Rock Finishing is your foremost choice, where our art meets your floor.
- Can Epoxy Flooring Be Applied to Wood Surfaces?
Short Answer: Yes, but it's not ideal due to epoxy's rigidity, which may lead to delamination on the naturally flexible wood surfaces over time. Introduction Epoxy flooring, known for its seamless finish, comprises a mix of epoxy resin and hardener, granting it superior durability and resilience. This type of coating is predominantly used for concrete floors to shield them from wear and tear, while also enhancing their visual appeal with a clear, glossy finish. Notably favored for garage floors due to its ability to withstand heavy foot traffic, epoxy flooring also offers protection against chemical spills and stains from substances like oils, grease, or gasoline. While its application on concrete surfaces is widespread, there is intrigue around its suitability for wood surfaces such as decks, patios, and walkways. Is Applying Epoxy Flooring to Wood Surfaces Advisable? Epoxy flooring, with its tough layering, is indeed adaptable to a variety of surfaces, including wood. It appears to be a viable option for protecting and sealing wood surfaces from stains, scratches, and dents, making it an attractive choice for areas subject to heavy use or frequent movement of furniture. However, it is essential to consider that wood, by nature, possesses a degree of flexibility, whereas epoxy is notably rigid. This fundamental difference raises questions about the long-term compatibility and effectiveness of epoxy coatings on wood flooring. Wooden floors tend to expand and contract with changes in humidity and temperature, a characteristic that does not align well with the rigid nature of epoxy. Over time, this mismatch can lead to the epoxy coating cracking or peeling away from the wood surface, compromising both the protective layer and the aesthetic quality of the floor. Furthermore, while it is theoretically possible to apply epoxy to wood, the process demands careful preparation and adherence to manufacturer guidelines. Wood surfaces often do not absorb adhesives as readily as concrete, requiring additional steps such as sanding and priming to enhance adhesion. Conclusion In conclusion, though epoxy can technically be applied to wood surfaces and may offer temporary protection and aesthetic enhancement, it is not generally advised. The intrinsic flexibility of wood paired with the rigidity of epoxy coatings poses challenges for durability and long-term performance. For those seeking to protect and seal wooden surfaces, alternative treatments that accommodate the natural characteristics of wood may be more appropriate. Epoxy's virtues of resistance to stains, chemicals, and physical damage remain best suited to more rigid surfaces, like concrete, where its properties can be fully utilized without compromise.
- Staining Concrete Floors, Why and How it's Done...
At C*Rock finishing we know clients often thing about staining as a concrete floor finish itself, it's not, however, staining a concrete floor is a great way to add color and character to your concrete. It's a great add-on option for concrete polishing, concrete sealing, or even a clear coat epoxy floor! Why to stain a concrete floor?.. Because why wouldn't you... When you have the option and want to add a little character to your floor to make a space more unique to your needs or the design you're looking to achieve. Most clients opt for staining to add a little bit more of a unique or specific look their going for outside of the modern mostly grey look of sealed concrete flooring. How it's done Staining Concrete Floors: Step 1 - Prepare the Surface and the Space To stain your concrete floor, no matter the type of finish it all starts with the surface prep, you'll need to do the following: Clean all dust, dirt, and debris from your concrete surface. You can use an industrial-strength cleaner or a high-quality degreaser for this task. Use a pressure washer if necessary. As a contractor however, we always advise for mechanically grinding for surface prep, wherever available, as this will give the most uniform results for making sure the concrete surface is clean and ready to receive a stain. Cover everything 4-6feet up the walls around the space to avoid overspray or staining anything which shouldn't be stained. Step 2 - Apply Stain Product used - Most often today, because the stain technology is actually so much better than previous forms of concrete stain, water-based stains are used most always today for effectiveness, clean up, environmental attributes, and of course ease of use or predictability. In no less than two coats, apply stain using a sprayers and working into the concrete surface with either broom or microfiber pads. Step 3 - Finish the Floor This is how you plan to seal the floor... If it's concrete polishing, then continue through the process of concrete polishing and sealing. If it's epoxy flooring, prep the space for the coating and apply a thin-mil clear coat. If it's just the application of a penetrating sealant, prep for sealant application and apply no less than two coats. Step 4 - Clean up... Clean Up... So... Concrete stains are a great way to add color and design elements to your concrete floors. They can be used on any type of concrete (including garage floor or basement floor), and there are many different colors to choose from. If you want to make your concrete floors more interesting, a concrete stain might be the way to go. I hope this guide has been helpful for you. Please let us know, if you have a project to discuss today! C*Rock Finishing contact links above or below!


